Difference between revisions of "How to install Windows in Legacy mode"
From fit-PC wiki
(→Links) (change visibility) |
|||
| Line 26: | Line 26: | ||
| − | === | + | === See also === |
[[File:Trio-500.jpg|none|300px|link=http://www.airtop-pc.com|caption]]The new [http://www.airtop-pc.com '''Airtop'''] - natural airflow desktop | [[File:Trio-500.jpg|none|300px|link=http://www.airtop-pc.com|caption]]The new [http://www.airtop-pc.com '''Airtop'''] - natural airflow desktop | ||
* [http://www.fit-pc.com/web/ fit-PC website] | * [http://www.fit-pc.com/web/ fit-PC website] | ||
* [http://www.fit-pc.com/web/purchasing/order-windows/ Fanless fit-PC Windows models ] | * [http://www.fit-pc.com/web/purchasing/order-windows/ Fanless fit-PC Windows models ] | ||
Revision as of 12:05, 14 June 2017
The procedure refers to Windows 7/8.1/10, 32-bit and 64-bit versions.
Contents
Preparing bootable USB drive
- Download Rufus application from: Rufus
- Connect USB drive to any computer. Make sure to disconnect all other USB mass storage devices.
- Run Rufus application and configure it as described in the screenshot.
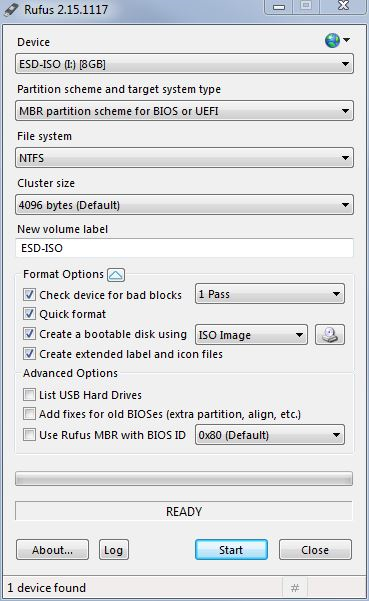
- Warning! Everything on the destination disk will be overwritten.
- Choose the Windows installation media image:
- Press Start button to proceed.
- Wait until completion.
- Disconnect the USB drive.


Installing Windows on Phoenix BIOS systems
- On the target PC set USB to be the first boot device in the boot order (in BIOS).
- Connect the prepared bootable USB drive to the target PC and boot from it.
- Click F5 during power up until the One-Time-Boot menu appears.
- Choose the USB HDD option from the list of bootable devices.
- Windows installation process will start.
Installing Windows on AMI BIOS systems
Coming soon ...
See also